Raspberry PI
For the Raspberry Pi, AvNav is available in various versions:
Images
Since version 20220421, the images support both "headless" operation — i.e., neither a keyboard nor a monitor is connected to the Pi — as well as operation with a connected (touch) screen, naturally with optional keyboard and mouse.
AvNav's operation is optimized for touch devices — but it can also be operated with a screen, keyboard, and mouse.
How you use the images depends on your use case. In "headless" operation, the Raspberry is only used as a server; the display is then shown, for example, on mobile devices. For this case, a Raspberry Pi 3B(+) is sufficient. If a monitor and peripherals such as a keyboard and mouse are connected directly to the Raspberry, you should choose a Pi4 or Pi5 with at least 2GB of RAM.
These images are maintained by BlackSea (many thanks...). These are built with pi-gen and contain AvNav, SignalK, and other software. A description can be found in the repository.
Under Windows/Linux/OSx, you download the image from free-x and transfer it, for example, to an SD card using the Raspi-Imager.
For this, select "Use Custom" under "CHOOSE OS" in the Imager and select the *.img file. Do not select any "customizations".
These images contain
- avnav
- avnav-raspi-base
- avnav-raspi-network
- avnav-update-plugin
- avnav-ochartsng-plugin
- avnav-mapproxy-plugin
- avnav-history-plugin
- SignalK
- Canboat
- Support for the MCS Board
- Optionally an X-Server with Openbox and Firefox in kiosk mode
- Support for various HATs
The images are preconfigured so that NMEA0183 data from all interfaces is routed to AvNav and from there to SignalK. AvNav additionally retrieves all data from SignalK and can display it. For details on SignalK integration, see this description.
NMEA2000 data runs via Canboat to SignalK and to AvNav.
For details on Canboat, see NMEA2000.
Image preparation
new as of version "20210322", extended as of version "20220421"
Before using the prepared SD card or SSD in the Raspberry, you should adjust some settings. This applies especially to passwords:
The images have a configuration file "avnav.conf". It can be found in the first partition of the SD card (boot partition). This file can be adjusted with a text editor.
You can also set there whether a local screen should be used ("Touch version").
It is easier to use a small web interface.
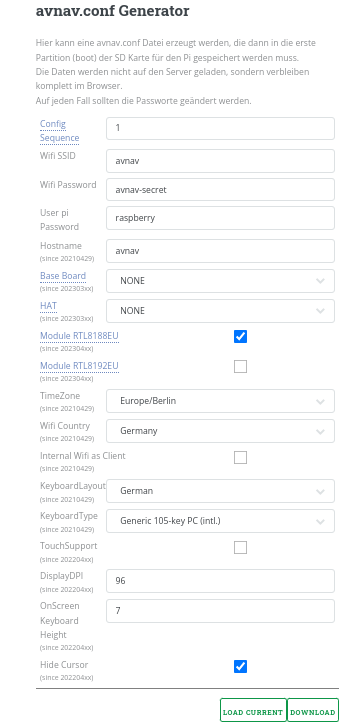
The meaning of the fields:
| Name | Default | Description |
|---|---|---|
| Image Release | trixie | Selection of the AvNav image version to be adjusted: Trixie or Bookworm |
| ConfigSequence | 1 | If you want the settings from avnav.conf to be re-activated in the system, you can increase this value. Otherwise, AvNav remembers which settings have already been set up and does not apply them again. |
| Wifi SSID | avnav | The name of the WLAN network that the Raspberry should create. For Bookworm, a single-digit number is appended to the name. |
| Wifi Password | avnav-secret | The password for the WLAN network. This should be changed in any case. Anyone who can connect to the WLAN can otherwise also influence the navigation! |
| Wifi Country | Germany | Sets the country for the Wifi settings. Selection from the list. |
| Wifi Interface | wlan-internal | Valid from Trixie: Here you can select which interface should be used for the Wifi hotspot. By default, the internal interface wlan-internal is used. If a different interface, e.g., an inserted adapter, is to be used, the name of the interface must be entered here. To do this, after plugging it in, first call up the Wifi page in the Server area and check the IP configuration via the Info button. All interfaces are displayed there. If an interface other than wlan-internal is entered, wlan-internal can later be used for client connections. |
| Wifi band | bg | Valid from Trixie: Wifi band for the hotspot. bg = 2.4 GHz, a = 5GHz. |
| Wifi channel | 7 | Valid from Trixie: Wifi channel for the hotspot |
| Wifi address | 192.168.30.10/24 | Valid from Trixie: The base address (and the range as a bitmask) for the network that the hotspot creates. |
| User pi password | raspberry | This is the password for the user "pi". This standard user is used when connecting via SSH or when accessing the Raspberry directly via monitor and keyboard. The password for the user "pi" should also definitely be changed. |
| Base Board | None | Here you can choose from supported base boards. * MCS: If this option is enabled, the necessary software for the Marine Control Server from GeDad is activated at the next boot. Changing the setting then leads to an automatic reboot when the Raspberry starts with this setting for the first time. * OBPPLOTTERV3: This sets the settings for the Open Boat Projects Plotter (V3). |
| HAT | None | Here you can select a supported Pi HAT. AvNav will make the corresponding entries for the overlays in /boot/config.txt and create the CAN network interfaces. * WAVESHAREB: Waveshare RS485 CAN HAT (B) * WAVESHAREA8: Waveshare RS485 CAN HAT (8Mhz) * WAVESHAREA12: Waveshare RS485 CAN HAT (12 Mhz) * WAVESHARE2CH: Waveshare 2CH CAN HAT * PICANM: PICAN-M * MCARTHUR: MacArthur HAT |
| Module RTL8188EU | off | not for Trixie and newer If enabled, the kernel driver for WLAN adapters with the RTL8188EU chipset is set up via DKMS. When the system kernel is updated (command line), the driver is recompiled. Not currently available for Bookworm images (or newer) because these drivers do not exist for them. |
| Module RTL8192EU | off | not for Trixie and newer If enabled, the kernel driver for WLAN adapters with the RTL8192EU chipset is set up via DKMS. When the system kernel is updated (command line), the driver is recompiled. Not currently available for Bookworm images (or newer) because these drivers do not exist for them. |
| TimeZone | Europe/Berlin | The time zone to be used in the image. |
| InternalWifi as Client | off | not for Trixie and newer If enabled, the internal Wifi adapter of the Pi is not defined as an access point, but can connect to other networks. Note: This requires an alternative way to access the headless Pi — see [Connecting to the Raspberry]. |
| KeyboardLayout | German | Layout for a connected keyboard (command line and X) |
| KeyboardType | Generic 105-key PC(intl.) | Type of connected keyboard |
| TouchSupport (from 20220421) | off | If enabled, an X-Server starts with a Firefox browser in kiosk mode. Via a button in AvNav, you can switch to another "screen" where a file manager, terminal, etc., are available. |
| Display DPI (from 20220421) | 96 | For local screen only: The resolution in dots/inch for the connected display. Clicking opens a small calculator where you can specify the dimensions of the screen in mm and pixels, from which the DPI value is calculated. Based on this value, some display elements are scaled. |
| OnScreen KeyboardHeight (from 20220421) | 7 | The height of a key row on the displayed On-Screen Keyboard. With the correct DPI setting, this value should be a good compromise. If you choose a very large value, there might not be enough screen area left when the keyboard is displayed... |
| HideCursor (from 20220421) | on | Hides the cursor on the local screen. If you want to work with a mouse, this switch must be set to "off". |
After entering the values, you can download the "avnav.conf" file by clicking on the "download" button. This must be saved to the first partition of the SD card. Any existing sample file must be overwritten! This partition must, of course, be visible on the computer. Under Windows, you will usually only be able to see the first partition. You may need to remove and re-insert the SD card after writing the image.
It is therefore recommended to save the "avnav.conf" file in a safe place so that it can be reused if necessary when creating a new SD card.
Now you can insert the SD card into the Raspberry and start it. The first boot process may take some time because the entire file system must be created on the SD card. Depending on the settings in the configuration, the Raspberry may restart one more time.
Once the Raspberry has finally completed its system setup, you can connect to it.
Local screen
If screen support was enabled during preparation, the "avnav-startx" service starts. This creates a local X server, a user session for the user pi with openbox as the window manager, and Firefox in kiosk mode.
The onboard keyboard is used as the on-screen keyboard.
On the main AvNav page (and on some other pages), a "Raspberry" button is displayed. Using this, you switch to a second virtual screen where you will find a file manager, a terminal, and various other tools.
The system is deliberately not designed as a complete desktop system in order to be as resource-efficient as possible.
Since the system tools can only be accessed via the button in the AvNav app, it makes sense to set up another access to the Pi as described above.
This allows you to access the system in case of a fault.
A restart of the user interface from the command line can be done with
.
If Firefox ever fails to start correctly, you can delete the user profile. It will be automatically recreated on the next start.
Attention: AvNav settings that have not been saved on the server will be lost in the process.
sudo systemctl stop avnav-startx
rm -rf /home/pi/.mozilla/firefox/avnav
sudo systemctl start avnav-startx
As of version 20230614, an additional panel is always displayed on the main screen whenever AvNav is not (or not completely) active.
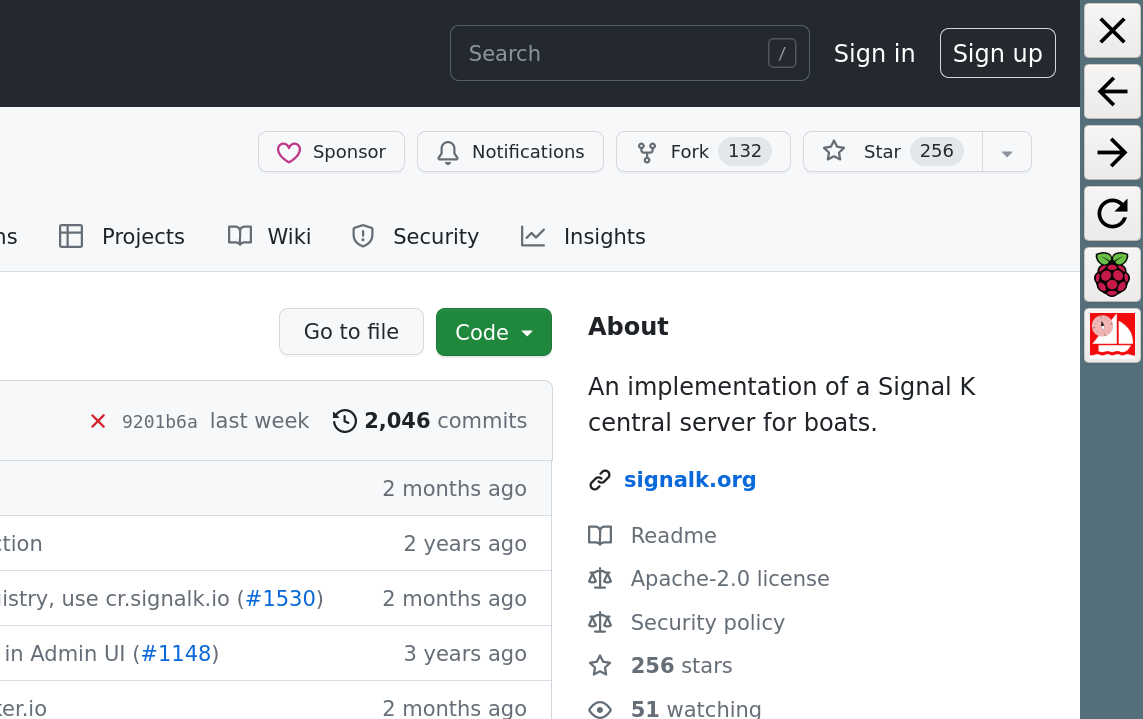
Via this panel, some navigation functions in Firefox can be controlled, you can switch to the second screen (system) — and you can execute the reset function for the Firefox user profile described above ( ).
This allows the system to be operated even if AvNav unexpectedly does not start completely. The reset function is also found on the system screen, but only for complete new installations.
Repositories
On the AvNav images, Debian repositories are preconfigured that contain all necessary packages; see also: Package Installation. These repositories are also used by the AvNav Updater.
Packages
If you do not want to use the AvNav images or OpenPlotter on the Raspberry Pi, you can also install AvNav as a package on a Debian or Ubuntu system. To do this, you can follow the installation instructions for Linux packages. In this case, only the "avnav" package should be installed, none of the "avnav-raspi" packages.
On AvNav images, updates should be performed via the AvNav Updater. However, for repair purposes or for installing beta versions, package installation can also be used.
The following basic AvNav packages are installed:
- avnav - AvNav base package
- avnav-raspi-base - Valid from Debian Trixie: Specific functions for the AvNav image
- avnav-raspi-network - Valid from Debian Trixie: Configuration of the network with the NetworkManager
OpenPlotter
If you want a complete desktop system with many other applications, the OpenPlotter variant can be a good basis. A Pi4 or Pi5 with 4GB of RAM is recommended for this. 2GB of RAM will also suffice — but there won't be much room left for future requirements.
For OpenPlotter, there is a complete integration of AvNav (thanks to e-sailing). In the repository https://www.free-x.de/deb4op/, which comes standard with OpenPlotter 2 and 3, the necessary packages are already available. Thus, you can simply install them:
Since March 2021, AvNav is officially available in OpenPlotter. Thus, "openplotter-avnav" should already be available after an OpenPlotter update.
The "avnav-raspi....deb" packages should not be installed on OpenPlotter because they are incompatible with the OpenPlotter network settings. Within the OpenPlotter-AvNav configuration, you can change the HTTP port for AvNav if there are problems with other apps. The default values are: :8080 for browser access, :8082 for O-Charts.
When you install AvNav with the OpenPlotter app, AvNav receives all NMEA data from SignalK and does not search for USB devices itself. All device configurations or interface settings can thus be made directly in OpenPlotter and SignalK.